Database
Setup
The APIO core software requires a PostgreSQL database to store its data.
The database can be installed on the same server as the APIO core software or on a different server.
The database must be accessible from the APIO core software server.
The documentation to install the database of APIO can be found here here.
INFO
This procedure takes a backup of the whole database of Fusion for Broadworks solution, which includes APIO core and the Broadworks Gateway, the size of the database might vary a lot, ensure you enough space to do the backup.
Replication
Postgresql support streaming replication. The documentation can be found here.
WARNING
The replicate(s) are not actually used by the APIO core software. But we highly recommend to setup a replication to avoid data loss.
Single postgres instance
WARNING
This procedure assumes that you are familiar with Postgres and the installation process of APIO and/or Broadworks Gateway.
Backup
First, we need to locate the files of the running instance. As sudo, run su - postgresand then psql -c "SHOW hba_file;" Which in our case would reply :
/data/db/pg_hba.confINFO
In our case, the database folder is in /data/db but in a non standard installation, the database could also be in those locations :
/etc/postgresql/<version>/main/postgresql.conf (Debian/Ubuntu)/var/lib/pgsql/<version>/data/postgresql.conf (CentOS/Red Hat)
After we found the pg_hba.confg file, we need to add those necessary to two entries for the backup to work.
# IPv4 loopback Host Based Authentication
host    replication     postgres     127.0.0.1/32       trust
# IPv6 loopback Host Based Authentication
host    replication     postgres     ::1/128            trust
We can now restart postgres with systemctl reload postgres
Lastly, use the following command to create a backup file of the database:
pg_basebackup -h localhost -U postgres -F tar -z -X fetch -D /backups/backup_$(date +%Y%m%d%H%M%S)/INFO
The backup doesn't require to stop the APIO core software.
Restore
Prerequisites
Ensure that all APIO Core services and the PostgreSQL instance are stopped before starting the restore process with the following command.
docker-compose -f </apio/docker/dir/>docker-compose.yml stop
systemctl stop postgresql
Restore Procedure
Step 1: Remove existing PostgreSQL data (DB node)
Switch to the postgres user and delete the PostgreSQL data directory contents.
su - postgres
rm -rf <route/to/postgres/data/*>
WARNING
This action permanently deletes the current database data. Ensure the backup is valid before proceeding.
Step 2: Extract the database backup (DB node)
As the postgres user, navigate to the PostgreSQL data directory and extract the backup archive.
su - postgres
cd <route/to/postgres/data/>
tar -zxvf /backups/backup_<date>/base.tar.gz
Step 3: Restart PostgreSQL (DB node)
Switch to the root user and start the PostgreSQL service.
systemctl start postgresql
Step 4: Restart APIO Core services
Start the APIO Core services using Docker Compose.
docker-compose -f </apio/docker/dir/>docker-compose.yml start
Step 5: Validation
Ensure that everything is running correctly with the health checks documentation here
Postgres replication Cluster
Backup
INFO
The procedure is relatively similar compared to the single db instance, with the slight difference that you need to add your host ip at the end of the the pg_hba.conf file like so :
host replication repmgr <host_ip>/32 trustWe then need to restart postgres with systemctl restart postgres
We can now start the backup with the following command
pg_basebackup -h <host_ip> -U repmgr -F tar -z -X fetch -D /backups/backup_$(date +%Y%m%d%H%M%S)/The difference with the single DB instance is that we use the host ip of the machine, instead of localhost, and the user is repmgr, and not postgres.
Restore
Prerequisites
This restore procedure should only be used when the complete cluster must be recovered. If a single node must be recovered and a master PostgreSQL node is available, this node can be more easily recovered by using repmgr tool to clone its database content from the current master PostgreSQL instance.
STEP 1:
Stop the APIO services to ensure a safe restoration process: on both nodes
docker-compose -f </apio/docker/dir/>docker-compose.yml stop
STEP 2:
Stop postgres on both nodes
systemctl stop postgresql
STEP 3:
On the master DB node, as postgres user, delete the data into the PostgreSQL root directory
su – postgres
rm –rf <route/to/postgres/data/*>
STEP 4:
On the master DB node, as postgres user, untar the backup file base.tar.gz
su – postgres
cd <route/to/postgres/data/>
tar -zxvf /backups/backup_<date>/base.tar.gz
STEP 5:
On the master DB node, as root, restart postgres systemctl start postgresql
STEP 6:
Restart the APIO Core services on both APIO nodes. docker-compose -f </apio/docker/dir/>docker-compose.yml start
STEP 7:
In order to recover the standby node, we use DB Clone. Delete all content from the main postgreSQL directory of the standby DB node
su – postgres
rm –rf <route/to/postgres/data/*>
STEP 8:
Clone the data from the master node : as user postgres on the standby DB node run the following command :
su – postgres
repmgr -h <primary_host> -U repmgr -d repmgr -f /etc/repmgr/<version>/repmgr.conf standby clone
STEP 9:
Once the cloning procedure is finished, as root, restart postgres systemctl start postgresql
STEP 10:
Ensure that everything is running correctly with the health checks documentation here
Switchover
INFO
If the master PostgreSQL instance is not available anymore and cannot be restored in a sensible time, a standby PostgreSQL instance can be promoted as master. After the switchover, APIO and the Broadworks gateway needs to be reconfigured in order to point to the new master.
INFO
It is possible to setup automatic switch over, but this only applies to the database, it will still be necessary to manually change the IP of the database in the docker compose of APIO/BWGW. The procedure to implement this is situated here
STEP 1:
Stop all APIO Core services during the switchover: on both nodes
docker-compose -f </apio/docker/dir/>docker-compose.yml down –v
STEP 2:
Connect on the standby to-become-master node as postgres user. You can do a dry run to ensure all the prerequisites are in place
repmgr -f /etc/repmgr/<version>/repmgr.conf standby promote --dry-run
STEP 3:
If no error are shown you can run the same command without the dry-run flag
repmgr -f /etc/repmgr/<version>/repmgr.conf standby promote
STEP 4:
After promoting the server to master role, check the status with
repmgr -f /etc/repmgr/<version>/repmgr.conf cluster show
If everything went well, it will return the following :

STEP 5:
On both APIO nodes and gateway nodes, update the file </apio/docker/dir/>docker-compose.yml in order to point to the new master DB IP address
Example for APIO:
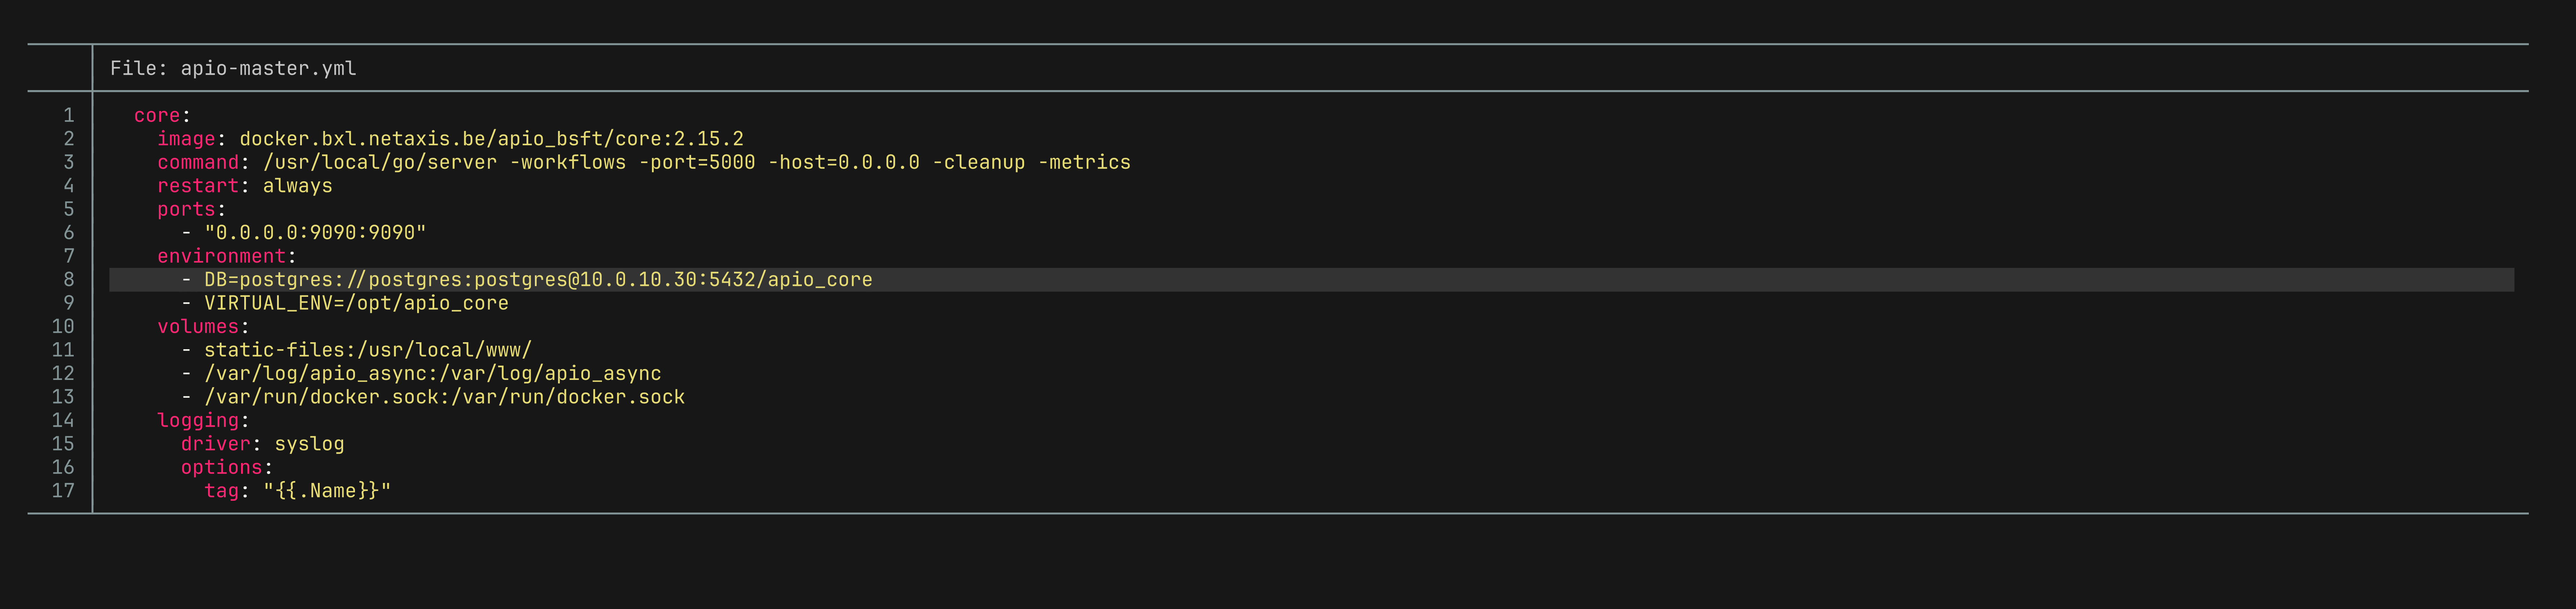 Would become
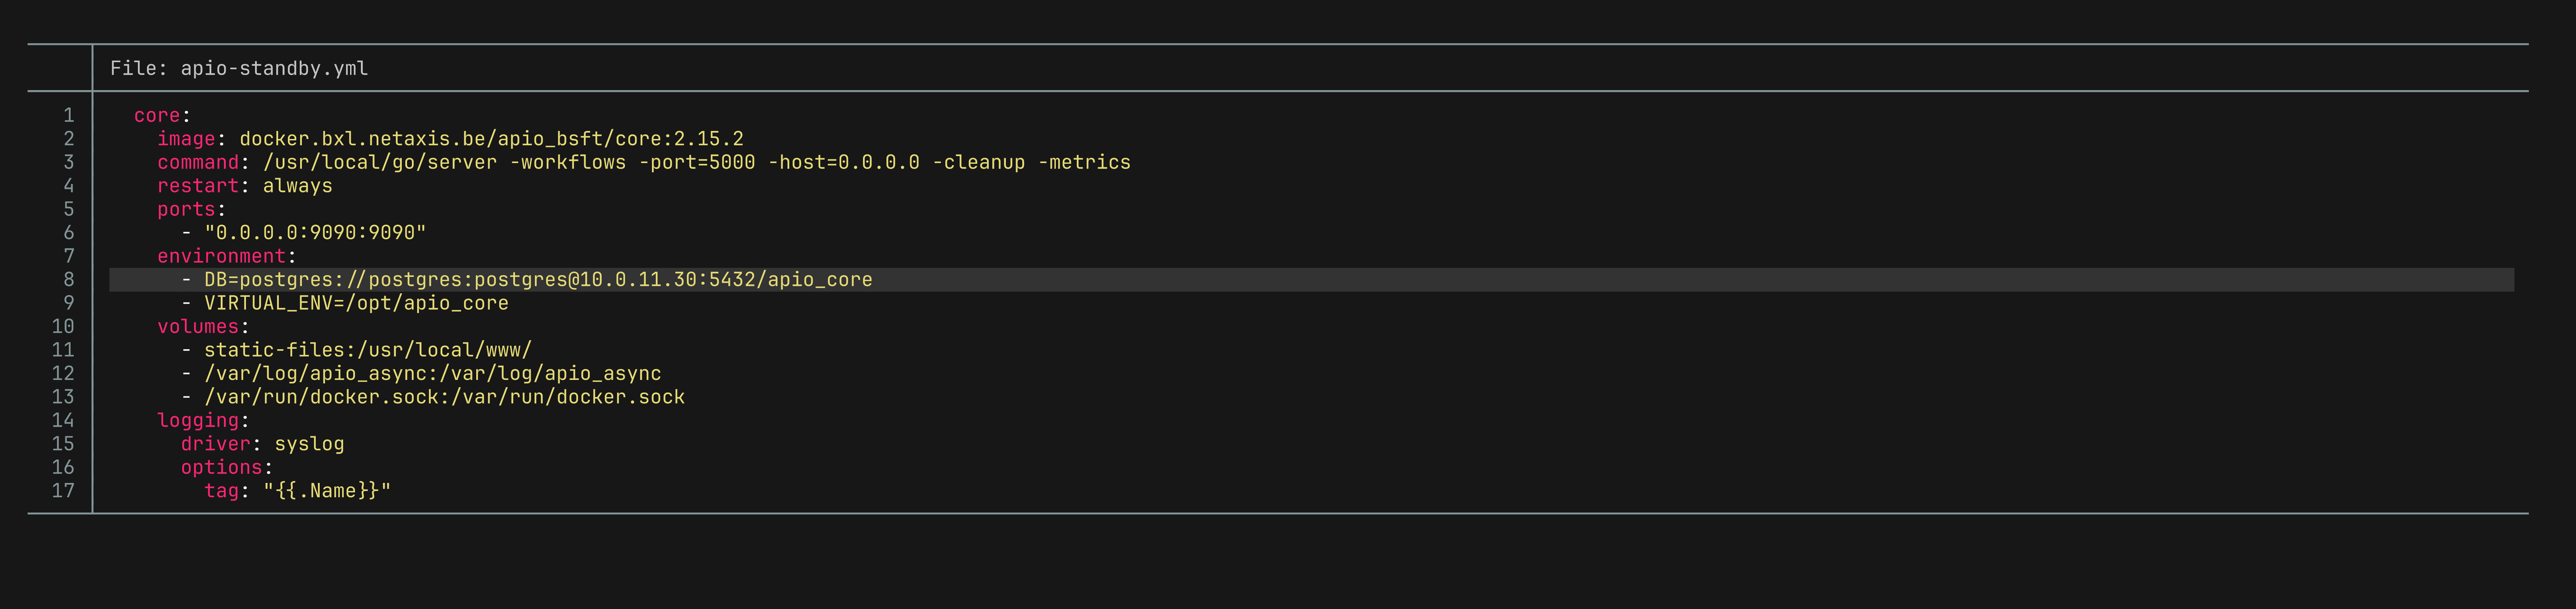
Example for Broadworks gateway:
 Would become
STEP 6:
Restart APIO Core services
docker-compose -f </apio/docker/dir/>docker-compose.yml up –d –-force-recreate
Step 7: Validation
Ensure that everything is running correctly with the health checks documentation here
Health checks
There are multiple ways to check that everything is up and running again after a recovery.
APIO
- Logging in to the portal works.
- Verify if there are any alarms in the APIO core portal
For more advanced health checks for APIO, visit the documentation here
Broadworks gateway
- Login to the APIO core portal, open the provisional UI and click config, create a new random Application Dat (key value store) and then delete it.
For more advanced health checks for Broadworks gateway, visit the documentation here